Hard anodizing
” Hard anodizing”
Rouhollah Omidi Far (Metallurgical Engineering Expert)
Reza Mehtar Gharedaghi (Senior Expert in Corrosion and Material Protection)

Introduction:
Protecting aluminum alloys against corrosive factors has always been a concern for designers and engineers. Lightweight, ease of manufacturing components from it, and high corrosion resistance are two important characteristics of aluminum alloys. This metal forms a protective layer of oxide when exposed to the atmosphere. The thickness of this layer is very low, around 0.01 to 0.025 micrometers, and this layer does not meet the requirements of many technical applications. Therefore, by artificially creating a thicker protective coating of aluminum oxide, suitable properties can be achieved in it. Increasing the thickness of the anodized layer improves hardness, corrosion resistance, wear resistance, electrical insulation, and color absorption capability.
Initial hard anodized coatings for engineering applications were developed in Germany using oxalic acid and in Russia using sulfuric acid. Initial research showed that reducing the concentration and temperature of the electrolyte solution reduces the dissolution rate of the oxide film in the solution, thereby significantly increasing the thickness of the anodized layer.
Hard Anodizing Process:
The benefits of hard anodized aluminum include its lightweight nature and low coating costs, with properties similar to hardened chrome, stainless steel, and hardened steels. Adding polytetrafluoroethylene (PTFE) to anodized coatings forms a hard oxide layer, providing corrosion and wear resistance on aluminum, with good adhesion and dielectric resistance. This allows aluminum to be used in place of more expensive materials in components such as gears, cylinders, pistons, clutches, brake components, orthopedic devices, and more.
Since this process has been used for several years, its benefits are well-known to materials engineers and designers. By implementing design considerations during the process stages, high dimensional accuracies and suitable coating qualities can be achieved, resulting in lower-cost production. The hard anodizing process involves immersing the aluminum component in a solution while applying a current.
Before immersion, parts must be cleaned, removing any natural oxides formed on the surface of aluminum. Subsequently, a reverse electrochemical reaction is carried out to form aluminum oxide, and additional finishing operations may be performed for improved properties if necessary. In the hard anodizing process, the current density typically differs from conventional anodizing. For hard anodizing, it ranges from 2 to 3.6 amps per square decimeter, resulting in a denser coating. While this process may seem straightforward, special skills are required to achieve the necessary hardness and dimensional accuracy. Design considerations for coating stages should include aluminum alloy parameters, manufacturing methods, and dimensional changes during anodizing.
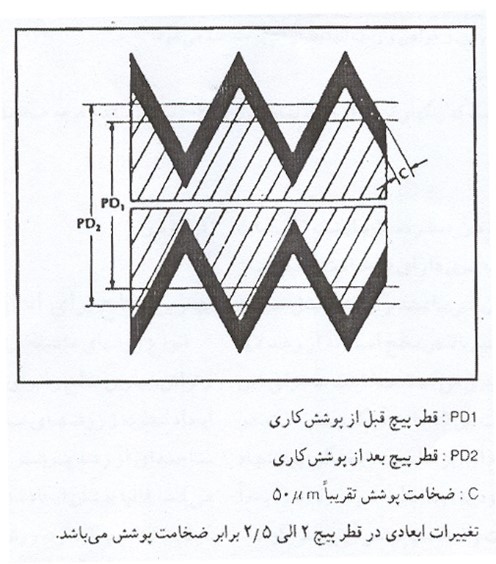
Effective parameters in hard anodizing include current density, electrolyte concentration, temperature, and coating thickness. To maintain dimensional accuracy, precise control must be exercised during the hard anodizing process. For most aluminum alloys, the conversion of aluminum to anodized aluminum in the anodizing process occurs to approximately half the thickness of the aluminum oxide coating. In other words, if 25 microns of aluminum is converted to Al2O3, it results in an equivalent thickness of 50 microns. Figure (1) illustrates the thickness variations in the coating of screws.


Effect of Alloy Composition:
Since hard anodized coating is produced from aluminum itself, the quality of the alloy and its composition affect the coating’s quality. Generally, harder and denser coatings are formed on highly pure aluminum or commercial pure aluminum, while the presence of alloying elements reduces density and hardness due to their insolubility in the process and the creation of microscopic pits. These pits decrease density and resistance to corrosion and wear. Various experiments have shown that the best coatings are less formed on copper and silicon alloys. Alloys such as 3003, 5052, 5082, 6061, 6262, 6063, 7075, and casting alloys 319, 355, and 356 may be suitable for this purpose. Other alloys can also be used for anodizing, but different results may be obtained. For another alloy where hard anodizing is required, the initial sample is first coated and then examined.
Color of the anodized coating can vary depending on the chemical compositions, type of heat treatment of the alloy, and coating thickness. The color of the coating depends on the alloying elements, and the alloy composition can be roughly identified based on the coating color. Often, cast components have non-uniform chemical compositions, resulting in different colors after anodizing. The method of aluminum production before the anodizing process also affects the coating color. The color of machined or welded parts differs from other sections because such operations introduce alloying inhomogeneities on the surface of the part.

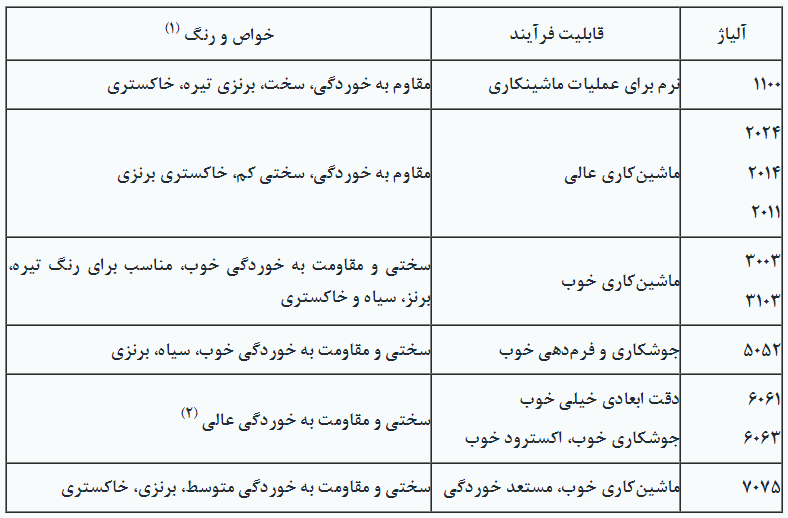
In the above table, standard aluminum alloys are listed along with their processability and properties, as well as their colors after anodizing.
1. The properties and colors mentioned are for a thickness of 50 micrometers.
2. Another feature of this series is suitable methyl coating and finishing. Its colors are 651T-6061 black-bronze and 6063 dark, and as the coating thickness increases, the color becomes darker.
In machining cast components, the underlying layer differs in terms of chemical composition from the surface layer.
Dimensional accuracies:
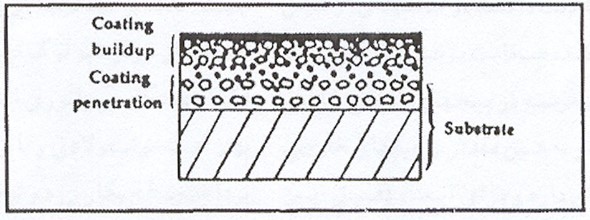
In most alloys, the standard thickness of the anodized layer is 50 micrometers. This is because the aluminum oxide coating has less density compared to the base aluminum metal. Growth and penetration occur simultaneously in this process. Half of the coating thickness forms beneath the surface, and the other half forms on the initial surface. Therefore, machining dimensions are designed in a way that after anodizing, we achieve the desired dimensions. Cast parts have a thinner thickness than the coating, primarily due to the high silicon content on the surface that prevents layer growth. The typical thickness of these parts ranges from 10 to 15 micrometers. During anodizing of cast parts, it is recommended to first sample the part and then examine the quality and thickness of the coating.
Care must be taken in pre-determined locations where the coating thickness decreases by 2 to 2.5 micrometers in internal screws and increases by the same amount in external screws. These variations should be considered before coating for precise dimensions.
The best level for anodizing:
Various machining methods such as milling and turning create the optimal surface for hard anodizing, while methods like sandblasting and scratching prevent coating growth. Often, the coatings formed on them lack adequate quality. The recommended method for removing protrusions from parts is to use non-sharp tools. If a vibratory device is used, it is better to use steel or non-ferrous materials for surface treatment and preferably avoid ceramic materials. Vibratory action should be accompanied by fresh water and a corrosion inhibitor.
Hard anodizing coating often creates a uniform thickness across the entire surface. However, in anodizing, corners and edges may not receive adequate coverage. To ensure proper coating, pay attention to the following:
-Pores and pits
-If the depth of a hidden pore is less than 1/25 of its diameter, the coating on it equals the external surfaces.
-(If the diameter is 13mm or more, 1/75 should be considered). If the depth of the pore is less than 2/5 of its diameter, the pores receive uniform coverage.(If the diameter is 13mm or more, 3/5 should be considered).
Sharp corners and edges:
Sharp corners and edges should be minimized in anodizing and, if coated, should be easily covered and removed. Therefore, a minimum recommended radius of 1.5mm is suggested for standard coatings with a thickness of 50μm and 2.0mm for coatings with a thickness of 25μm. For a radius of 2.5mm, the coating thickness is 75μm.
All dimensional tolerances should be considered based on the preparation and production stages of the parts after hard anodizing.
Surface finishing improvement:
Hard anodizing coatings typically create surface roughness, which is more prevalent in cast alloys. The degree of surface roughening and its increase in parts are not easily discernible. However, the alloy type, heat treatment process, coating thickness, and surface properties of aluminum affect the surface smoothness.
Two methods are suggested to compensate for the surface roughness created:
1. First, bring the surface of the parts to the appropriate surface smoothness before coating, and then apply hard anodizing to the piece. This method creates maximum hardness and corrosion resistance along with reducing friction coefficient. (To reduce friction coefficient, saturating the microporous coating with a durable and stable lubricant such as PTFE through a process like Niments Nituff can be employed).
2. Before coating, refine the surface to its final smoothness so that the necessary surface smoothness is achieved during the anodizing stage.
Preparation of parts:
During cleaning, care must be taken to ensure that defects such as scratches, holes, metal irregularities, etc., are not created on the surface. Firstly, heavy oxides and other visible contaminants must be manually removed. In some cases where machining lubricants, machine coolant, and other contaminants are used, it is better to coordinate with the manufacturers for cleaning or complete removal of these substances. Rivet studs and non-alloy parts that may be damaged due to high potential application should be protected, and the surfaces of machining holes can be connected to withstand electrical flow better.
Another application of hard anodizing is in injection moldings. Since there is often a time gap between the design of an aluminum mold and the delivery of a steel mold, some factories extend the lifespan of the designed mold by up to 10 times using hard anodizing. This lifespan extension facilitates continued operation until the steel mold is ready.
Reference:
1. Advanced materials & processes 9/94
2. The surface treatment and finishing of aluminum and its alloys by: S.Wernick & R.Pinner-1994


